
An agenda holds the class times for one course or activity. You create the agenda first, then add a period for each time it meets. If you have not read it yet, the article on how agendas, timetables, and periods fit together explains the idea in a few minutes.
The pictures use a made-up account and a made-up course called Computer Networks. Yours will show your own course.
Before you start
- Be online when you create the agenda. Acadeva sets it up on its servers, including its cover picture. Adding periods afterwards works without a connection and syncs later.
- Have the course name ready, plus its code if it has one, and the days and times it meets.
Step 1: Create the agenda
Open the Schedule tab and tap Manage. If you see Just a moment, wait for your schedule to finish loading first. On a new account you can also tap the Manage schedule button in the middle of the screen.
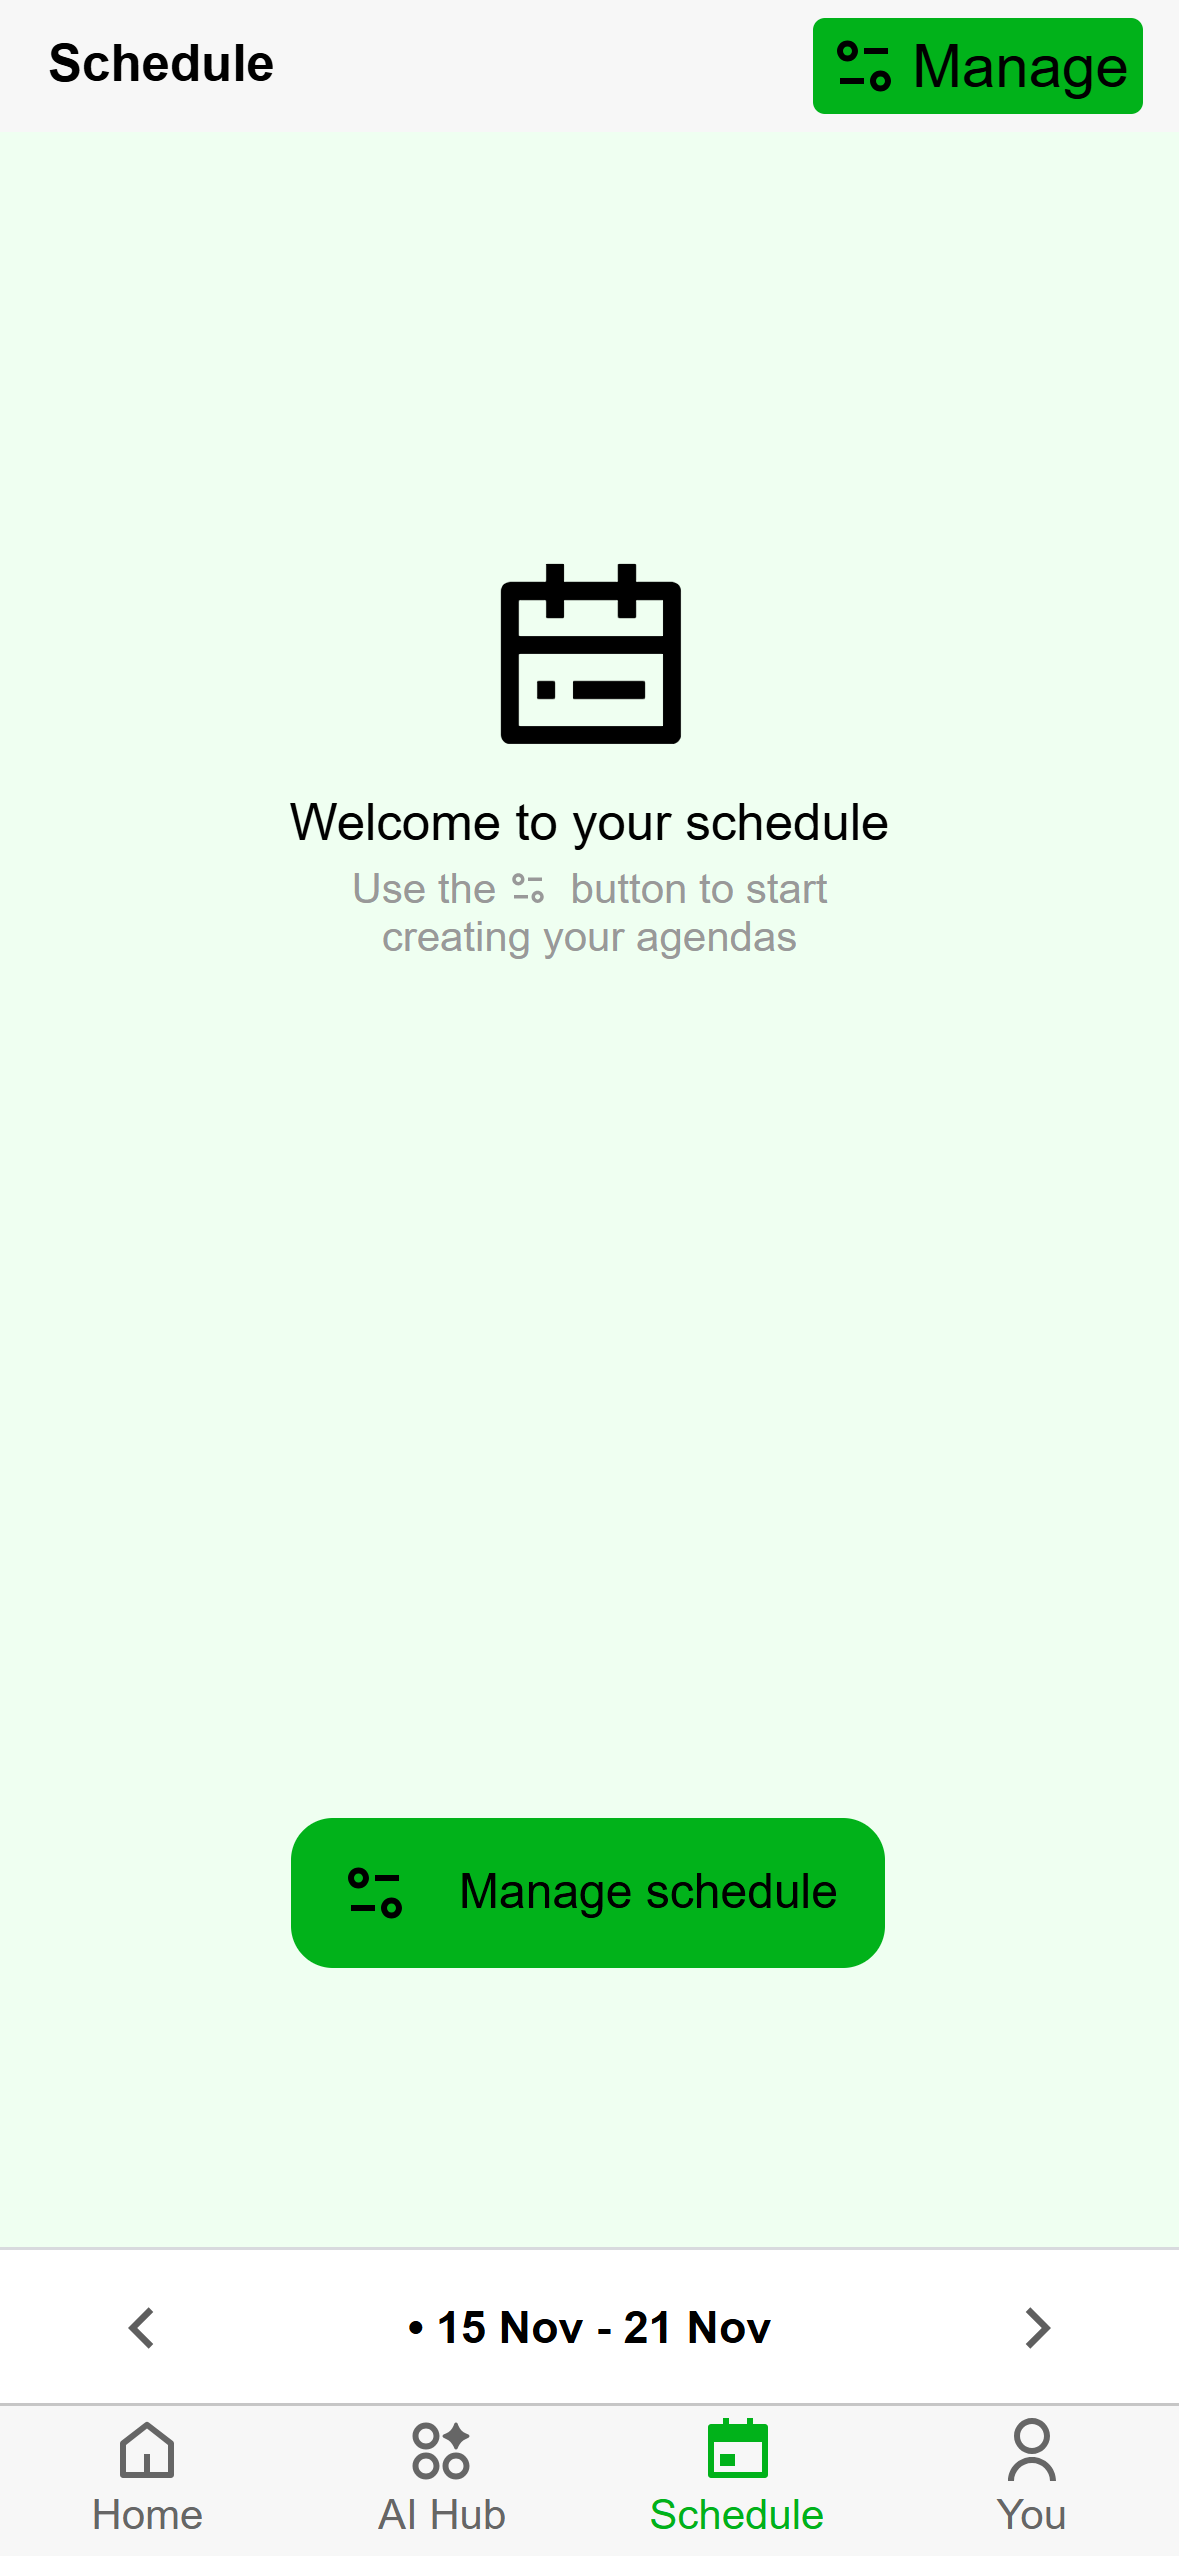
- Tap Manage.
- This button opens the same screen.
Mobile: The Schedule tab before you have any agendas. Tap Create new agenda.
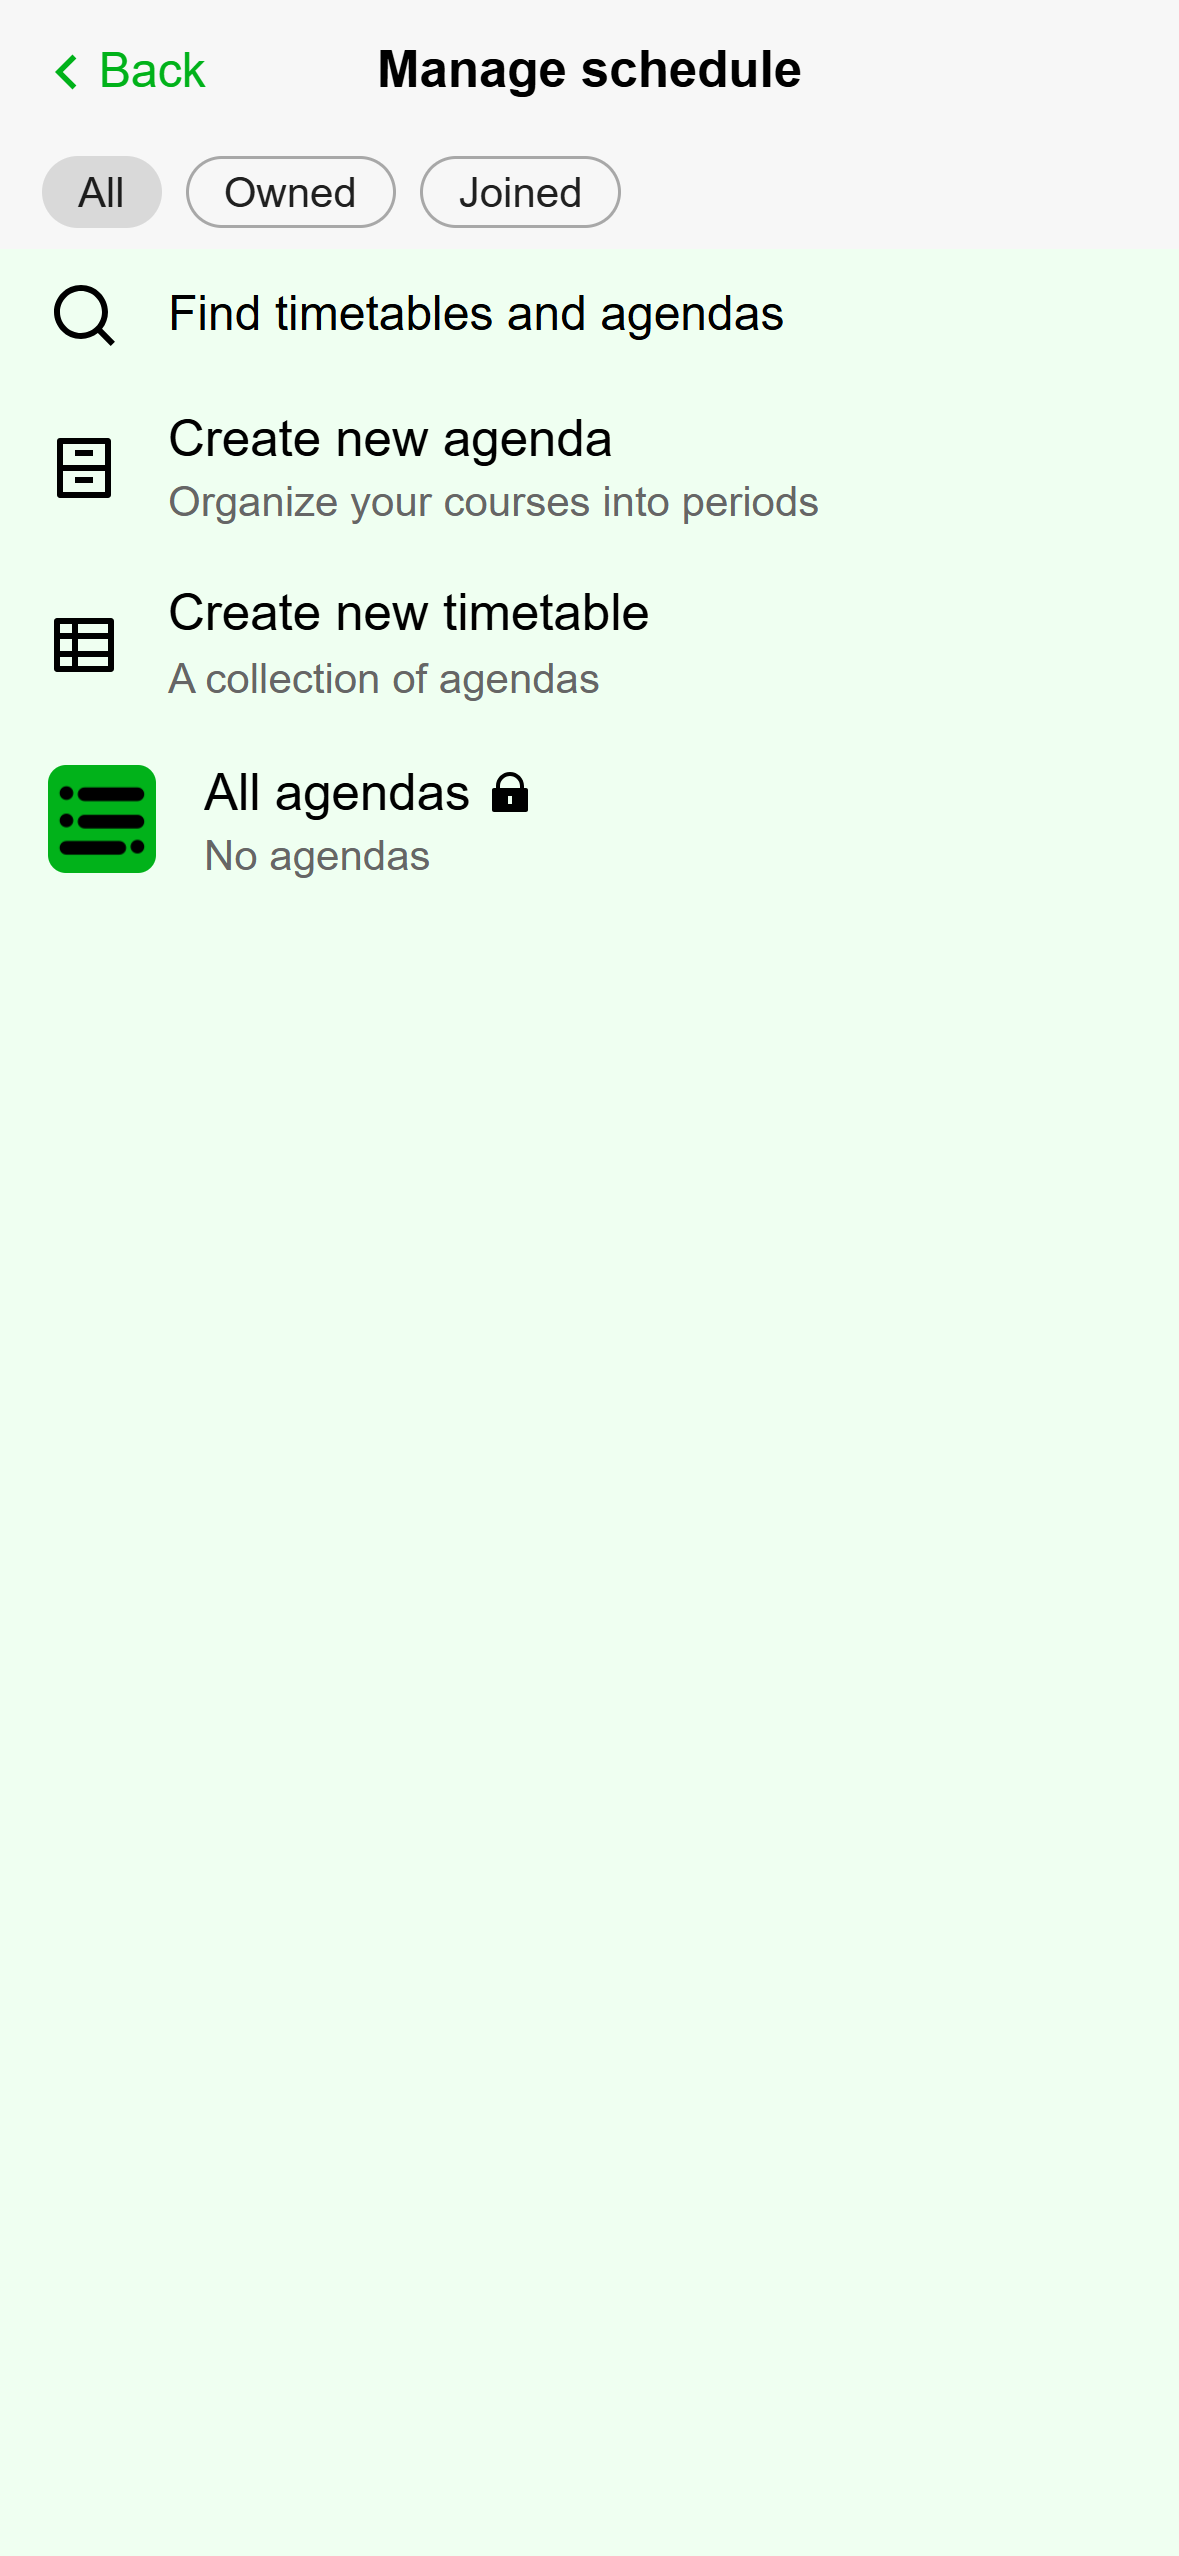
- Create new agenda.
Mobile: Manage schedule on the phone. Type an Agenda name. That is the only required field. You can also add a Description (Optional) of up to 60 characters, a Code (For courses) such as CSC 305, and an Entry Year (Optional).
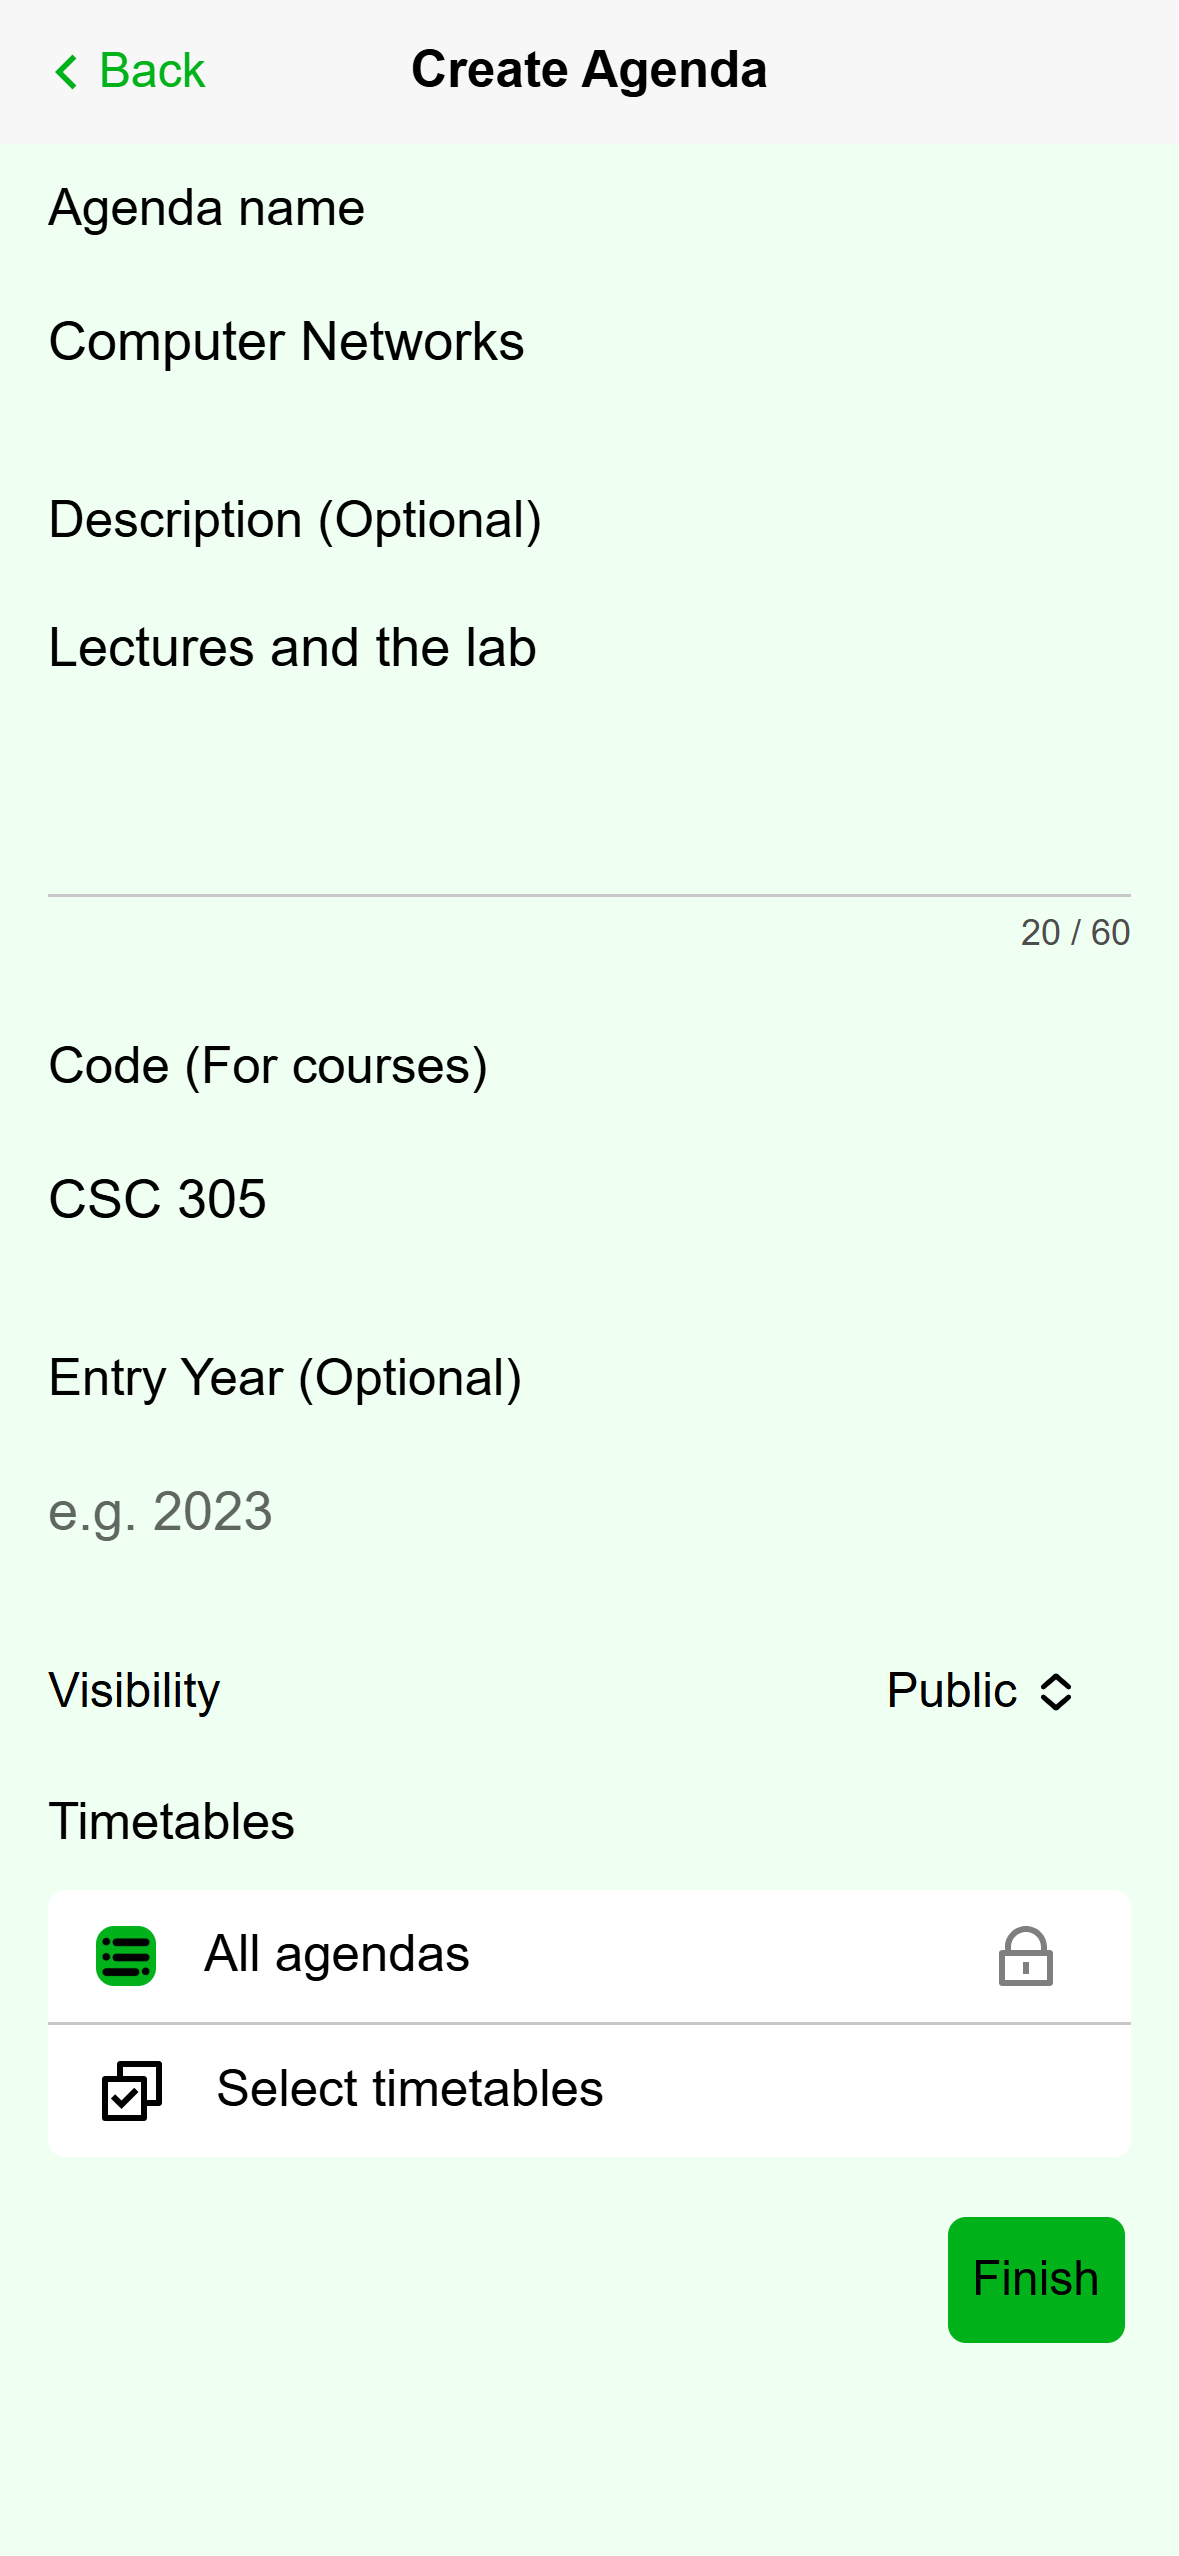
- The name is required. Finish stays disabled until you type one.
- The description stops at 60 characters.
- Public or Only you.
- Tap Finish when you are done.
Mobile: The Create Agenda form. Set Visibility. Public lets other people find the agenda when they search. Only you keeps it out of search. The phone starts on Public.
Optional: tap Select timetables, tick the timetables you want the agenda in, and tap Finish. You can also do this later.
Tap Finish. The app reloads and opens your new agenda, which has no periods yet.
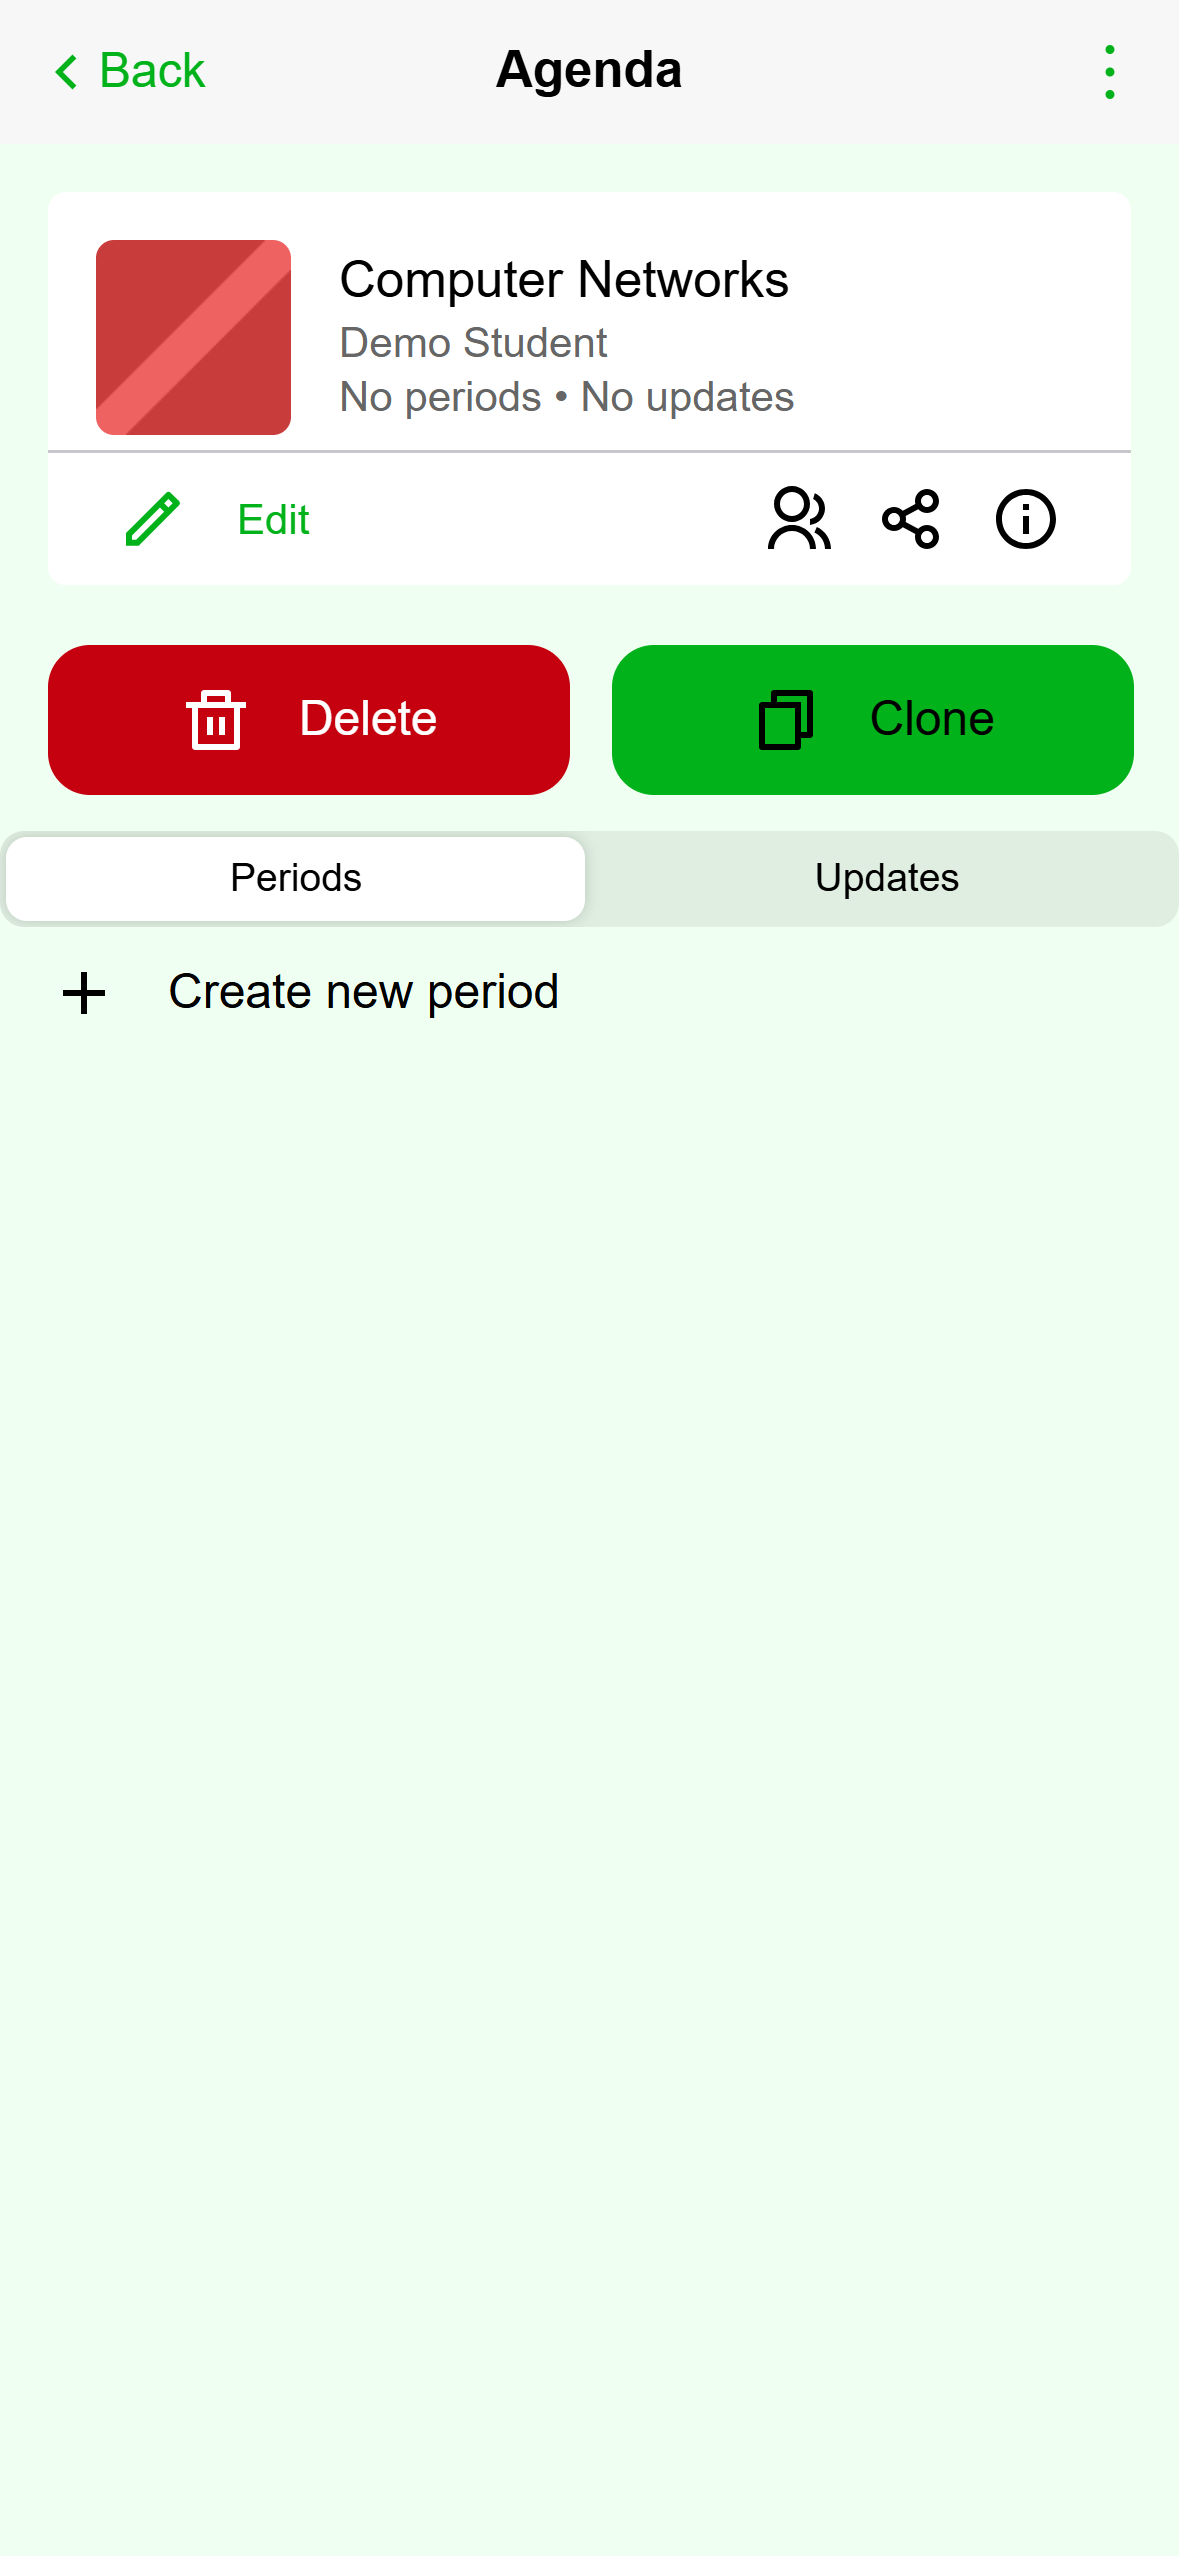
- Tap Create new period to add the first one.
Mobile: The new agenda, ready for its first period.
The first time, the phone may ask Get reminders for these classes? Tap Not now to skip it. You can connect reminders later.
Click Schedule in the left rail, then New agenda in the toolbar. On a new account you can click Create Agenda in the middle of the page instead.
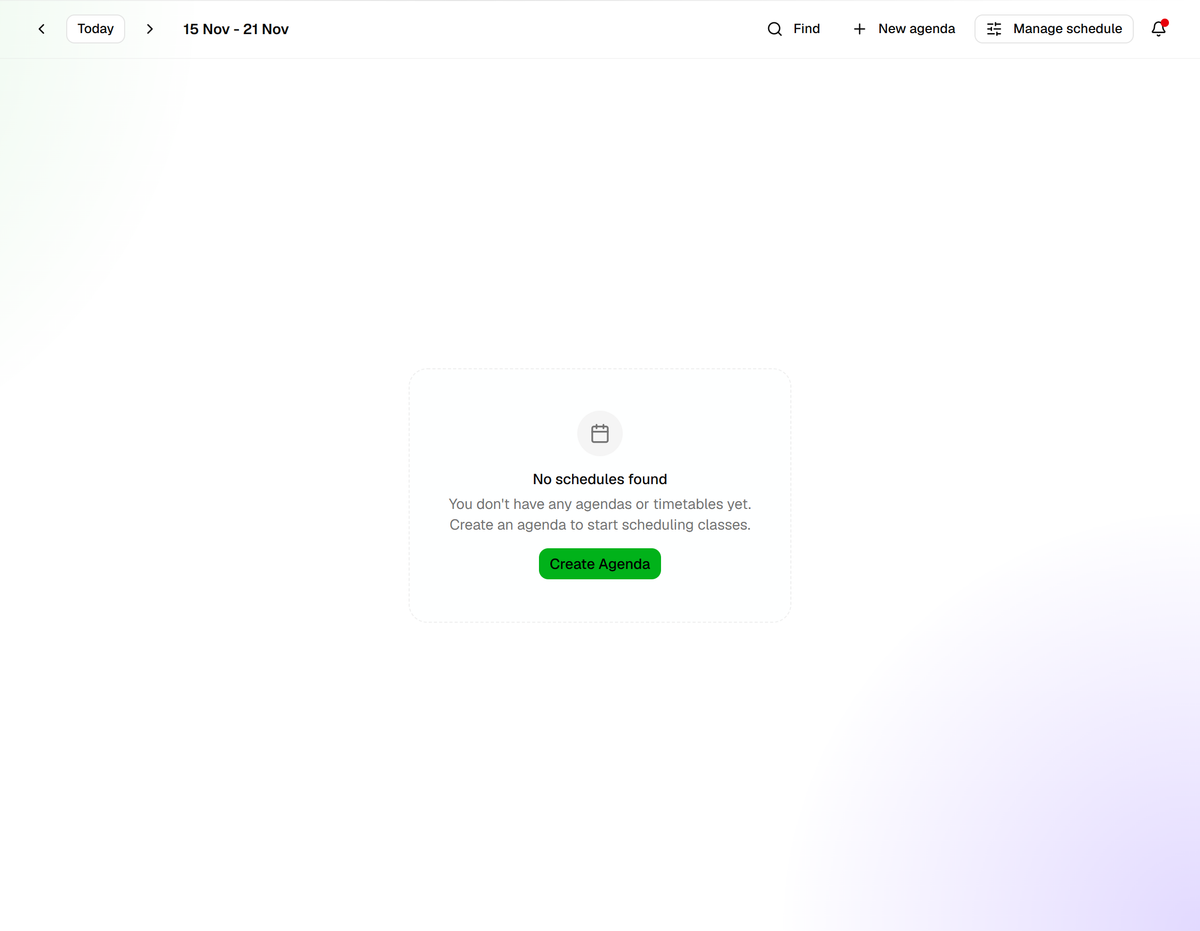
- New agenda.
- Create Agenda does the same.
Desktop: The Schedule page before you have any agendas. Type a Name. Add a Code such as CSC 305 and a Description if you like. Only the name is required.
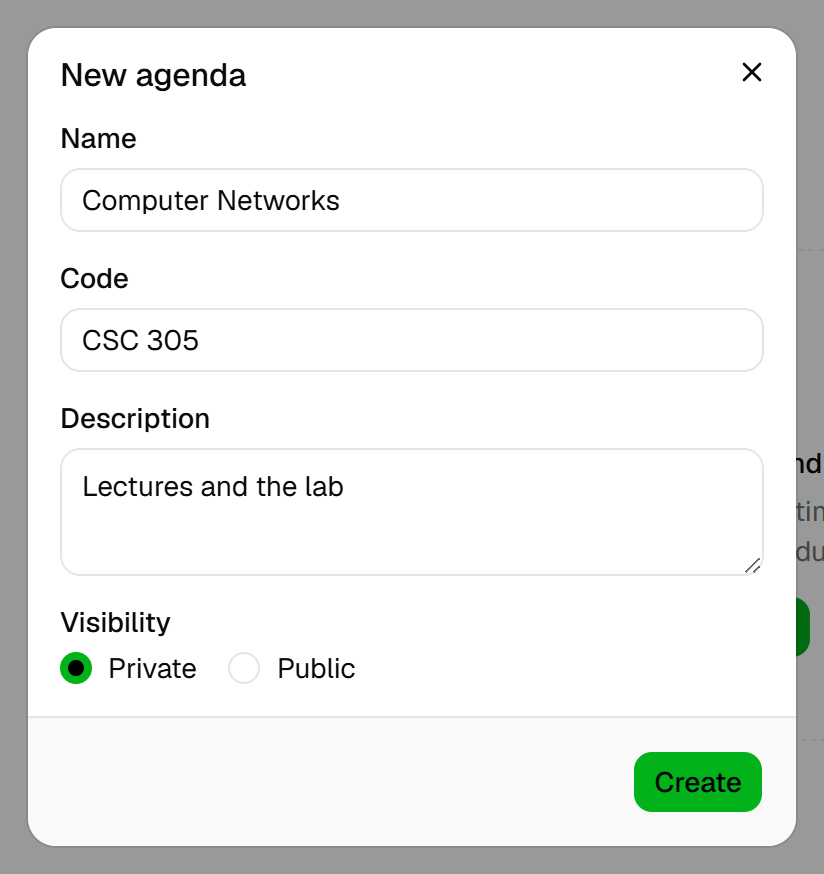
- The name is required.
- Private is the default. Pick Public to let others find it.
- Click Create.
Desktop: The New agenda dialog. Choose Visibility. Private is the default. Public lets other people find the agenda when they search.
Click Create. You see Agenda created, and the agenda appears under Owned agendas in Manage schedule.
The desktop form has no entry year and no timetable picker. To put an agenda in a timetable, open the timetable in Manage schedule and use Add under Agendas.
Step 2: Add periods
A period is one class time. Add one for every time the course meets. There are three types:
- Weekly repeats every week on one day.
- Daily repeats every week on the days you tick. Tick none and it repeats on every day.
- One time happens once, on the date you pick.
The desktop form also lists Monthly. It sets one date and does not repeat, so use One Time for a single class.
On the agenda page, tap Create new period. This row only appears on agendas you own.
Choose Weekly at the top. Tap the letter for the day the class meets (S M T W T F S, starting on Sunday). Sunday is already selected, so tap the right day.
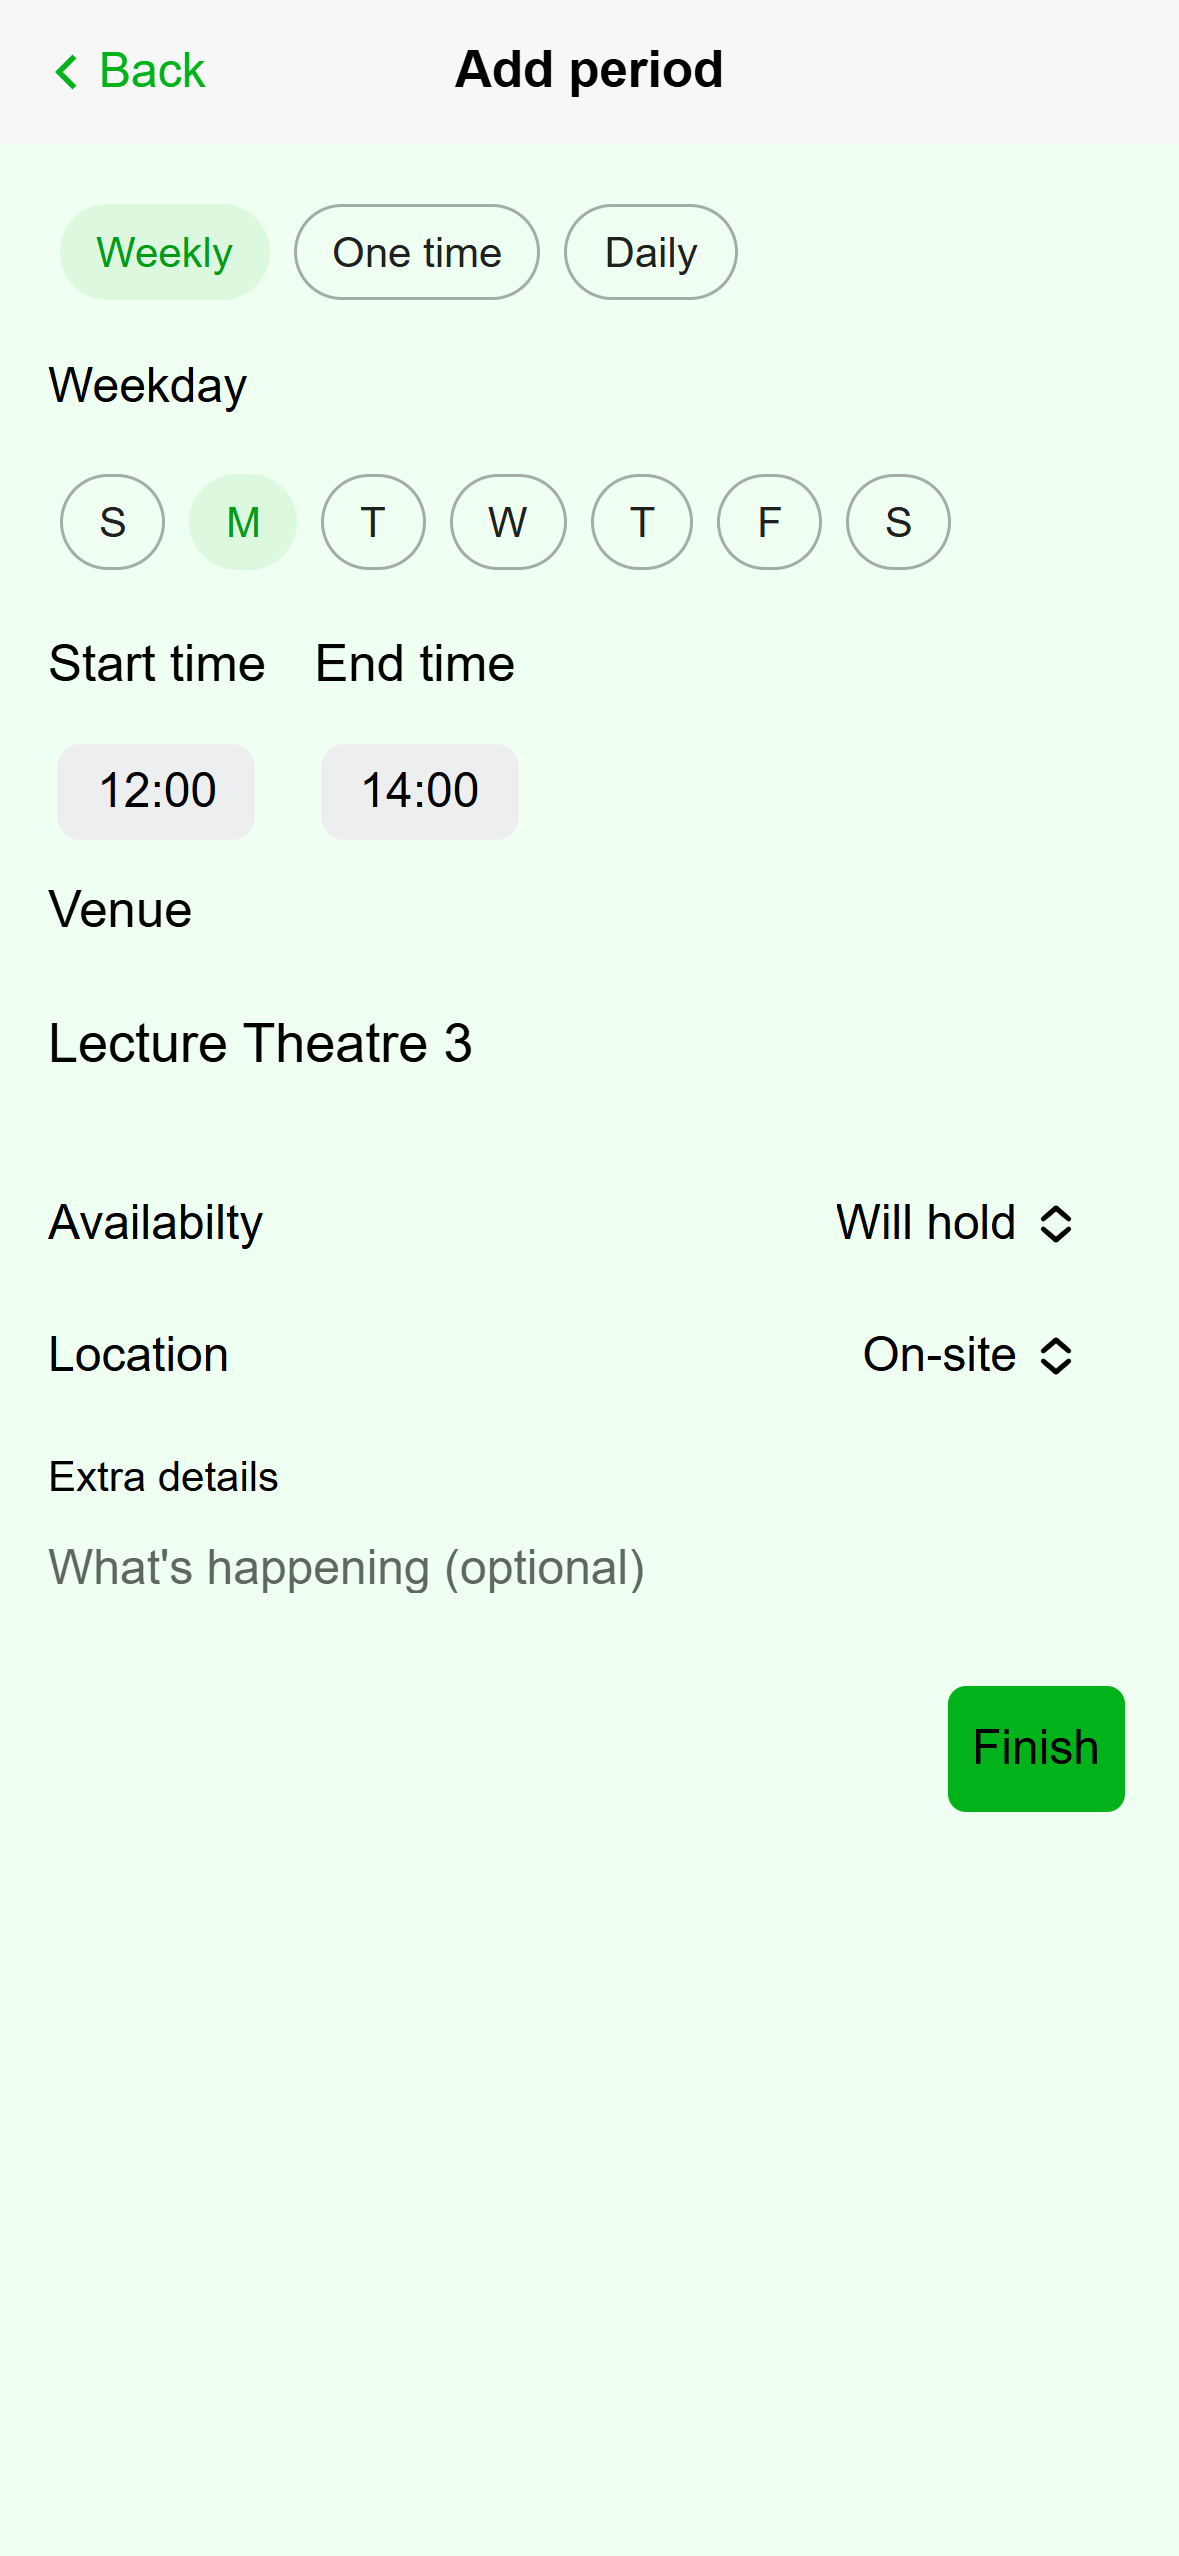
- The type: Weekly, One time, or Daily.
- The day of the week.
- Tap each time to change it.
- Tap Finish to save the period.
Mobile: A weekly period on Mondays. For a class on several days, choose Daily and tap every day it meets. Tick none to repeat on every day.
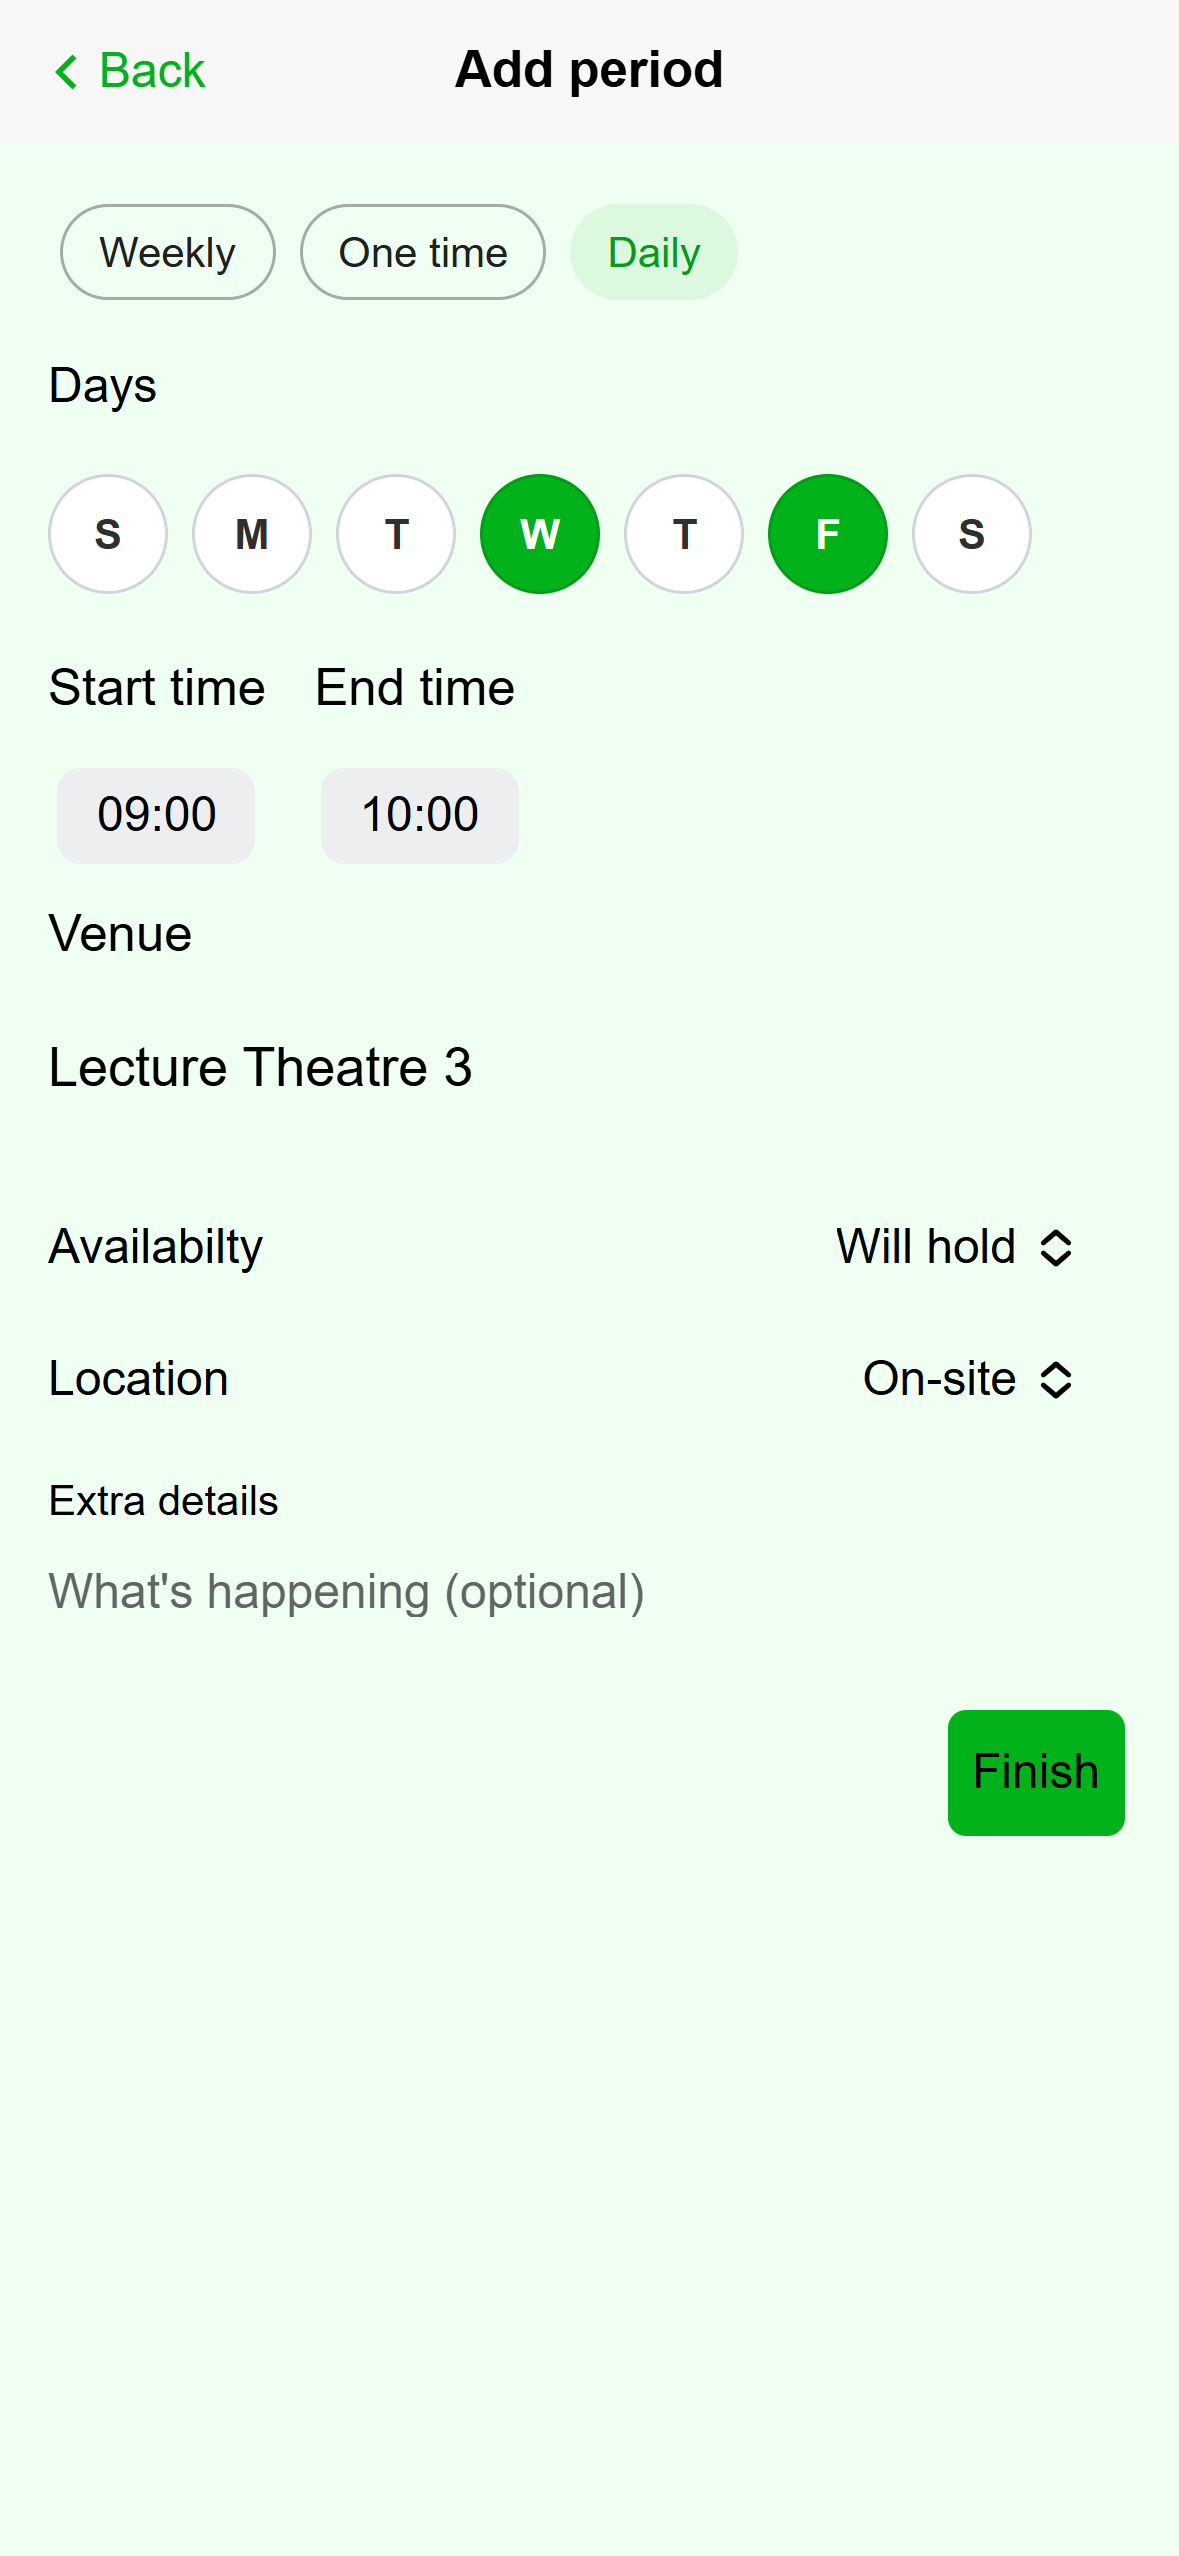
- Daily.
- Tap each day the class meets.
Mobile: A daily period on Wednesdays and Fridays. For a single class, choose One time and tap the date button to pick the day.
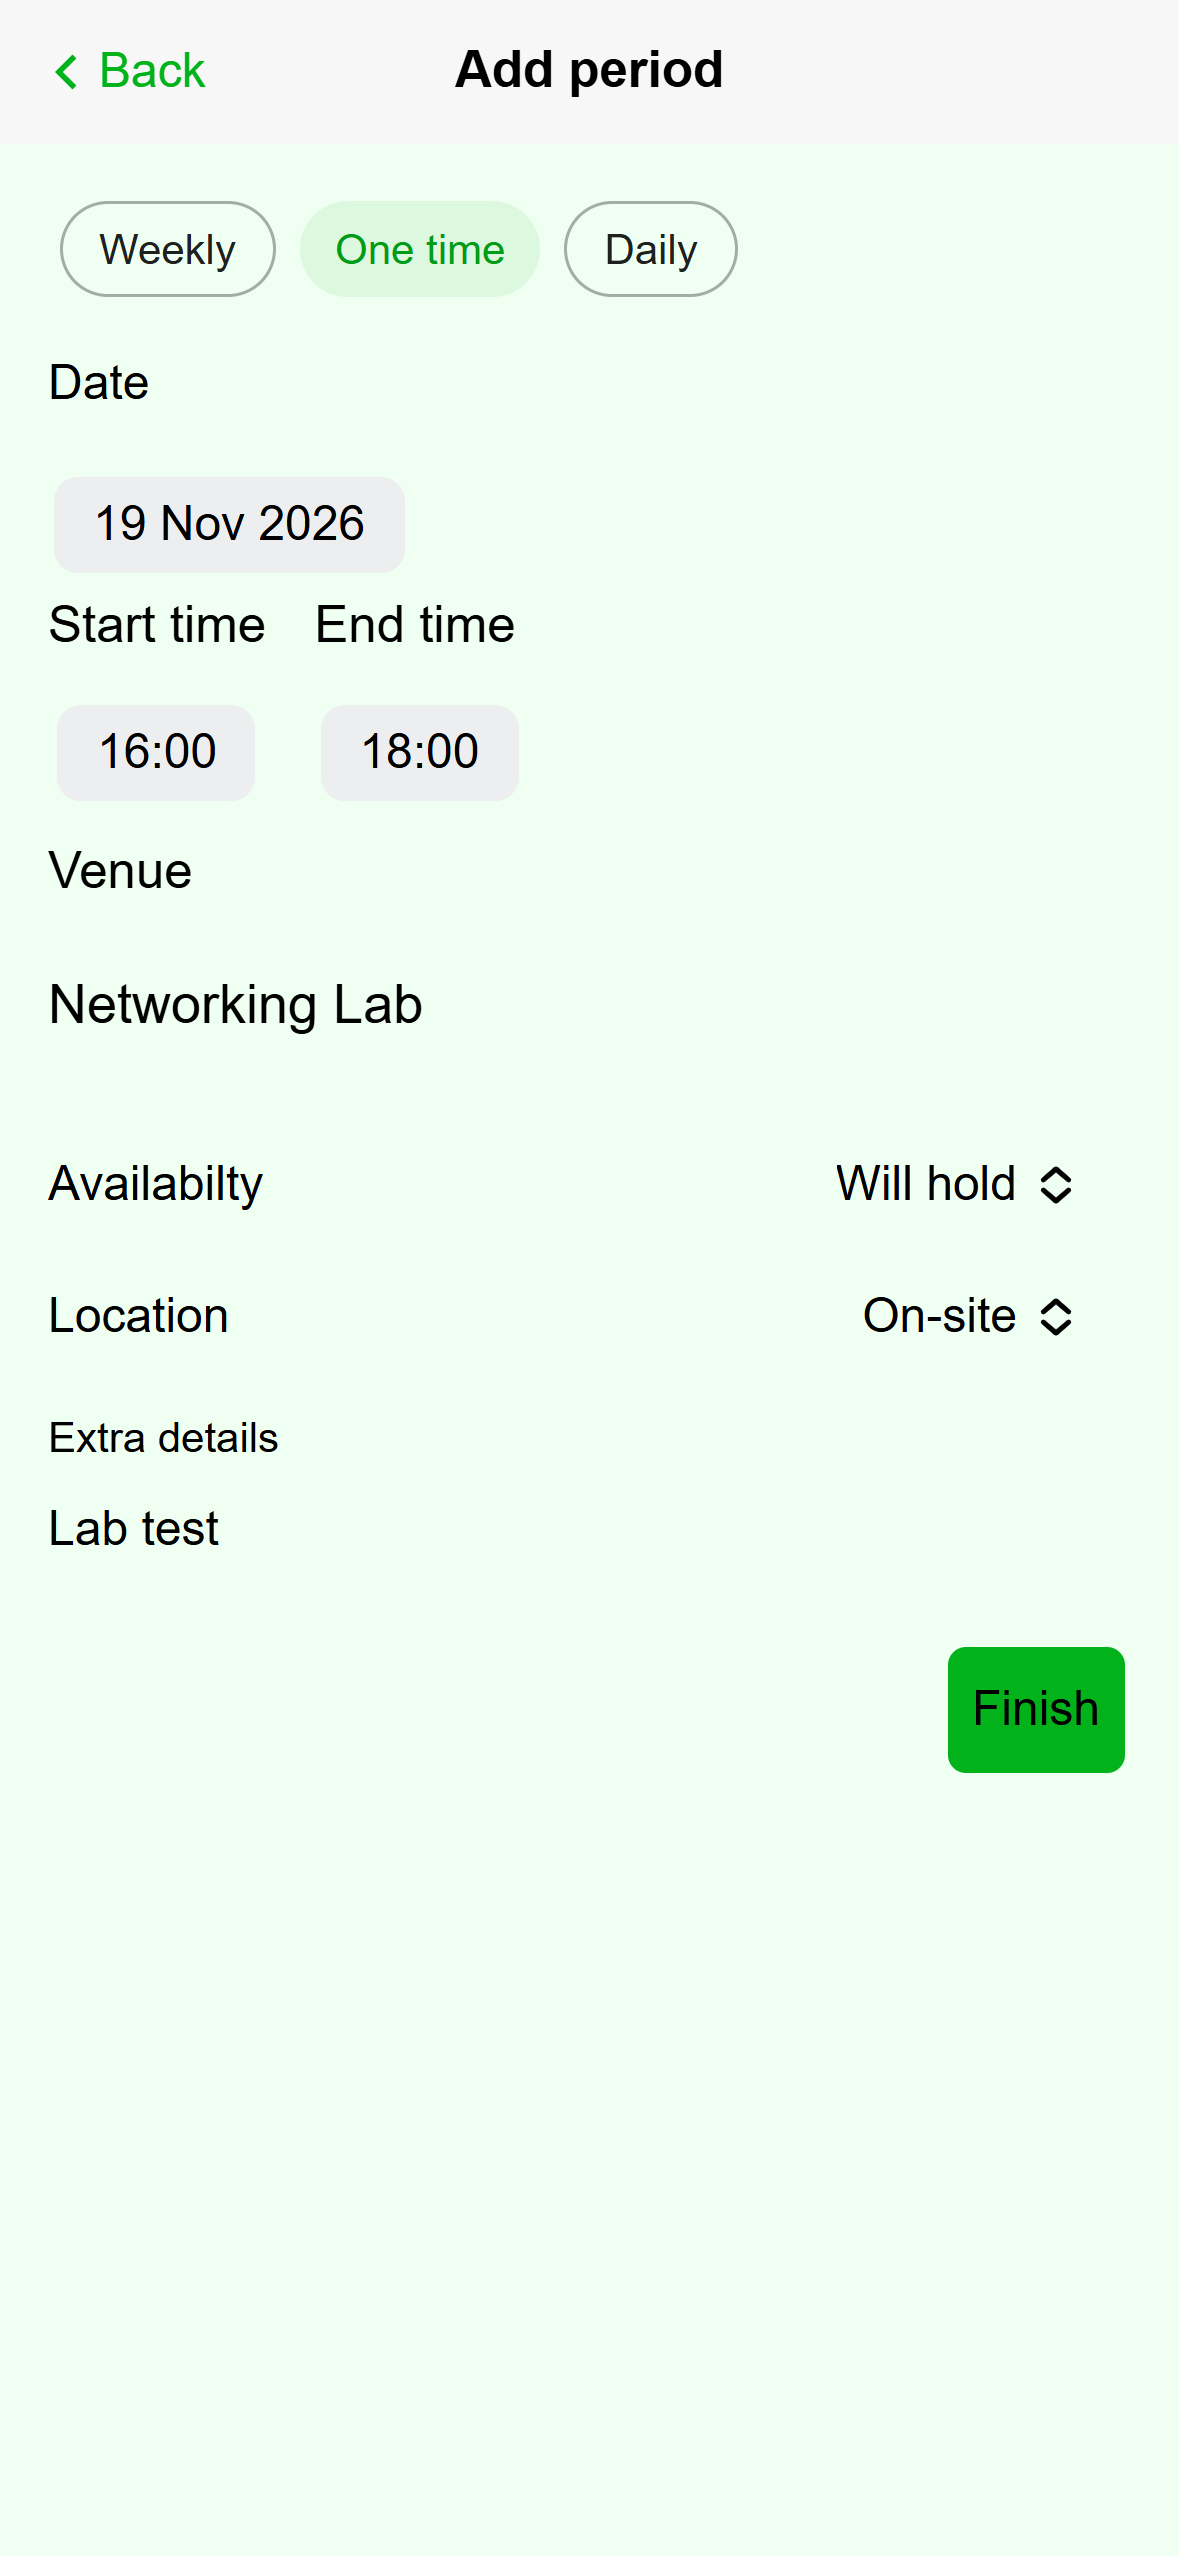
- One time.
- The date.
Mobile: A one time period with extra details. Set the Start time and End time and type the Venue. The dropdown under it says Will hold by default. Change it to Uncertain or Not holding if the class is in doubt. Location can be On-site or Virtual, and Extra details is for anything else you want to note.
Tap Finish. You go back to the agenda and the new period is in the list. Repeat for every time the course meets.
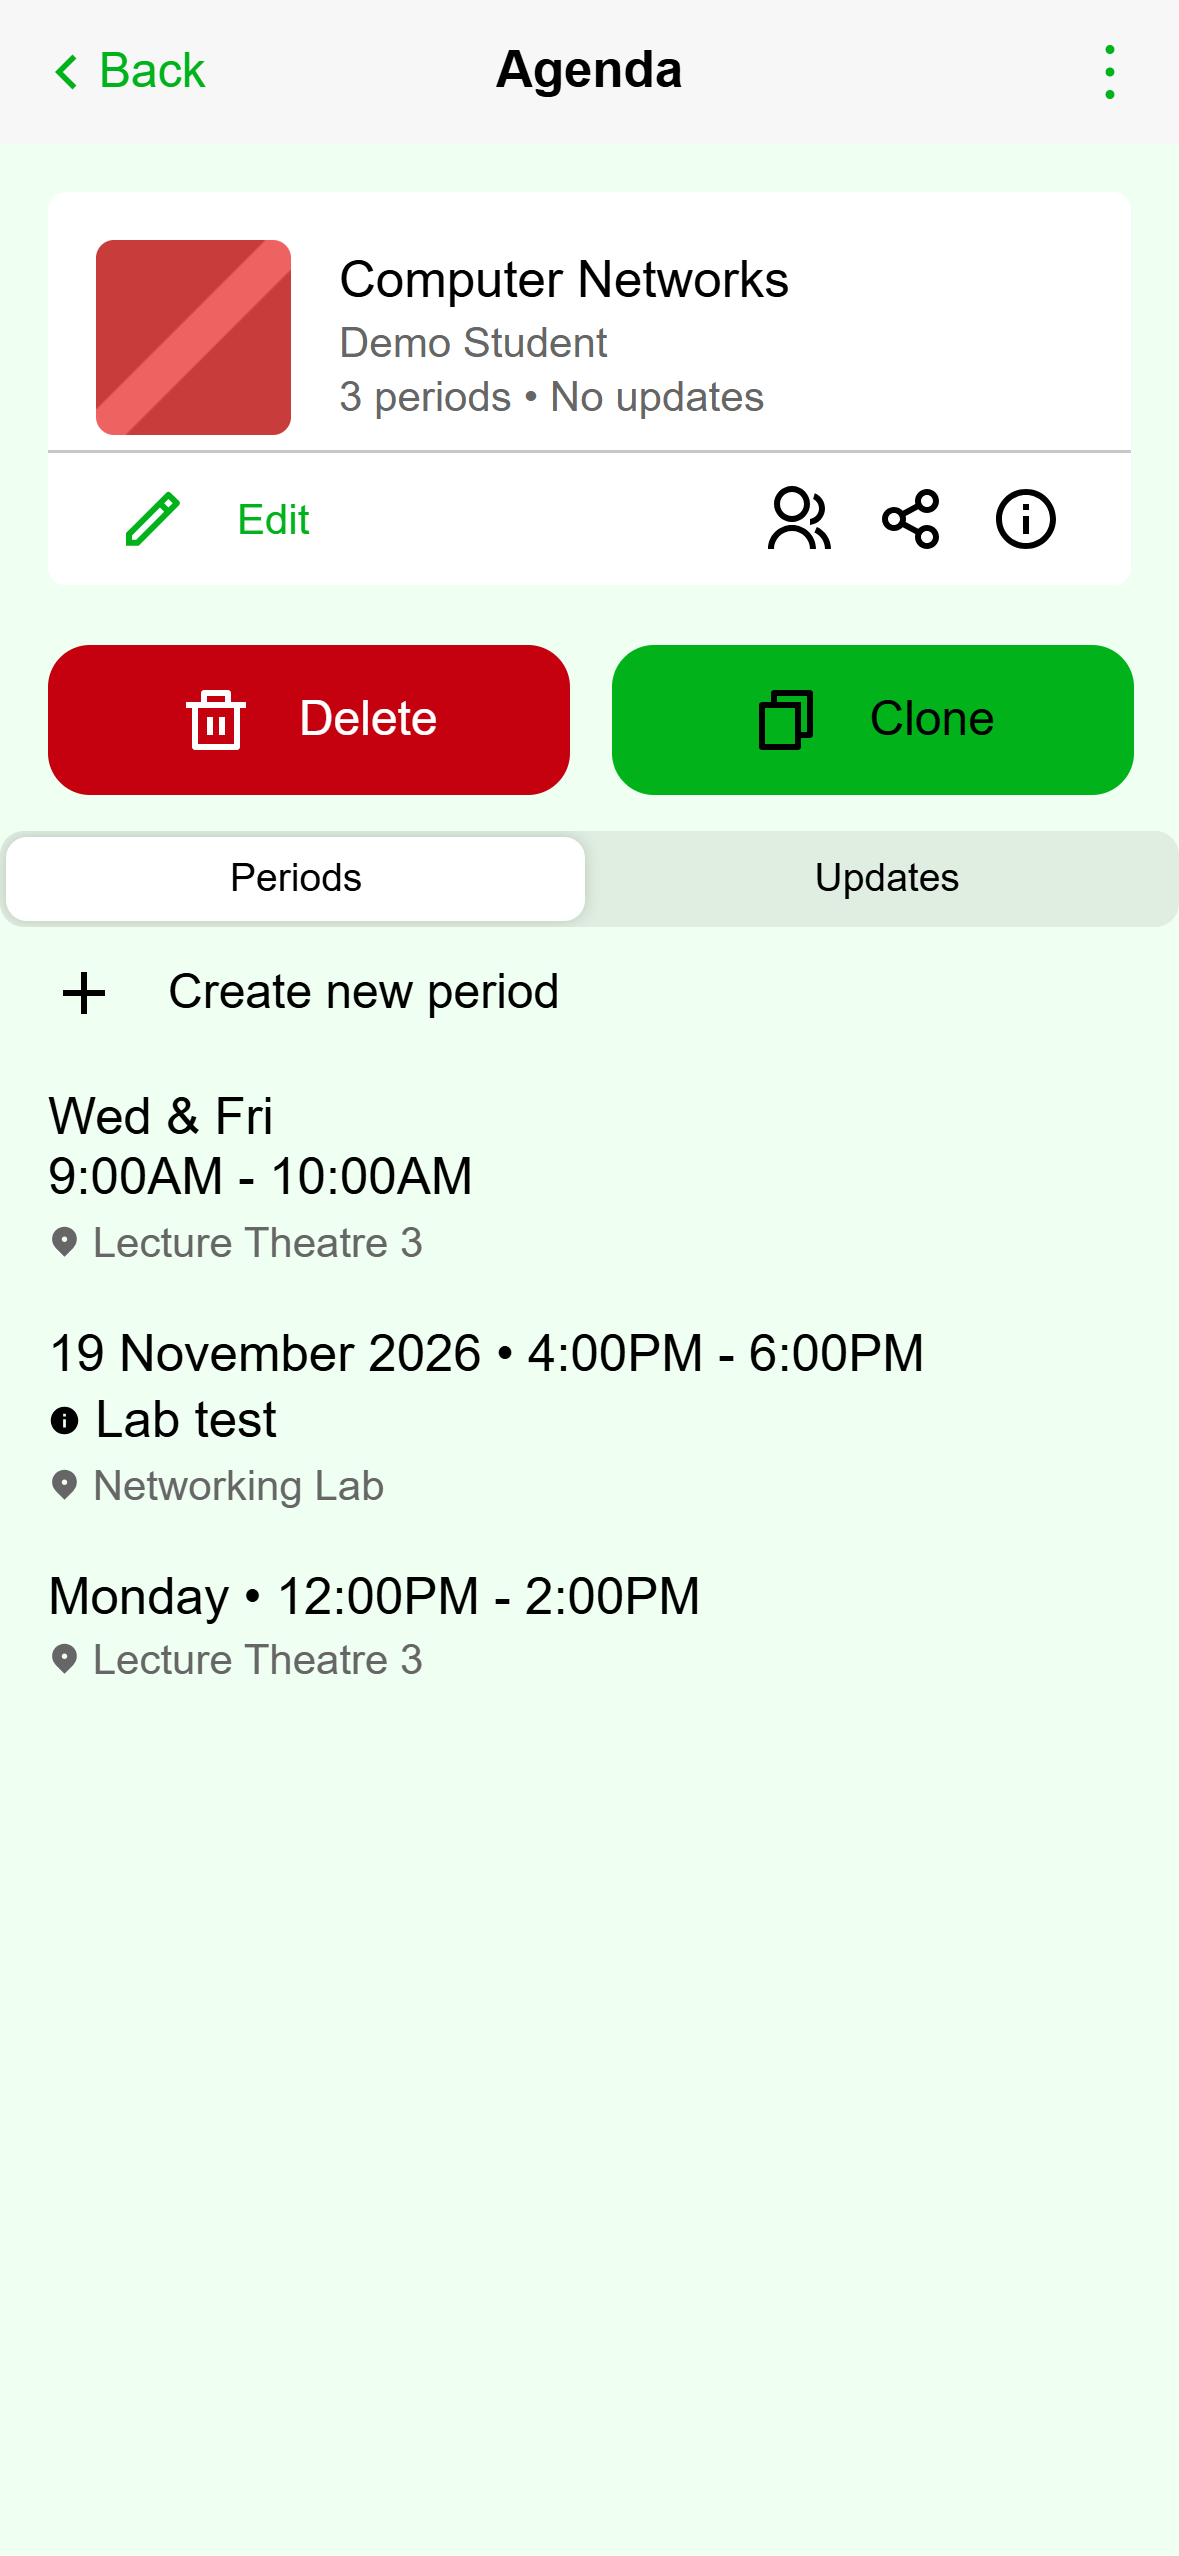
- The agenda lists each period with its day, time, and venue.
Mobile: The agenda with three periods.
Start from the week grid. Click an empty hour on the day you want, and New period opens with that day and hour filled in. Or open Manage schedule, expand the agenda, and click Add next to Periods. If you have no agenda yet, clicking the grid shows Create an agenda first and opens the New agenda dialog.
Check the Agenda field. It lists the agendas you own. Then choose a Type: Weekly, Daily, or One Time. For Weekly, pick the Day.
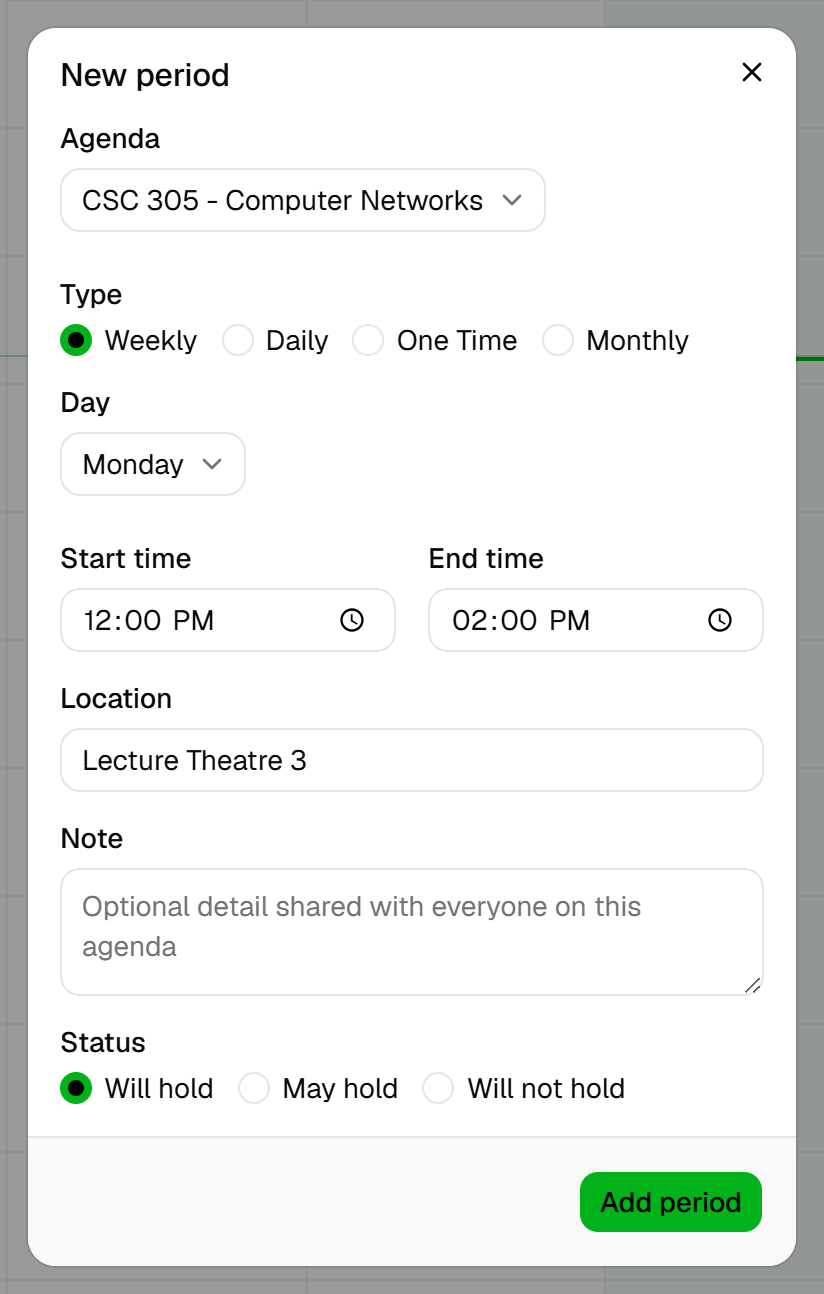
- The agenda the period belongs to.
- The type.
- The day of the week.
- Start and end time.
- Click Add period to save.
Desktop: A weekly period on Mondays. For a class on several days, choose Daily and click each day it meets. Click none to repeat on every day. For a single class, choose One Time and pick the Date.
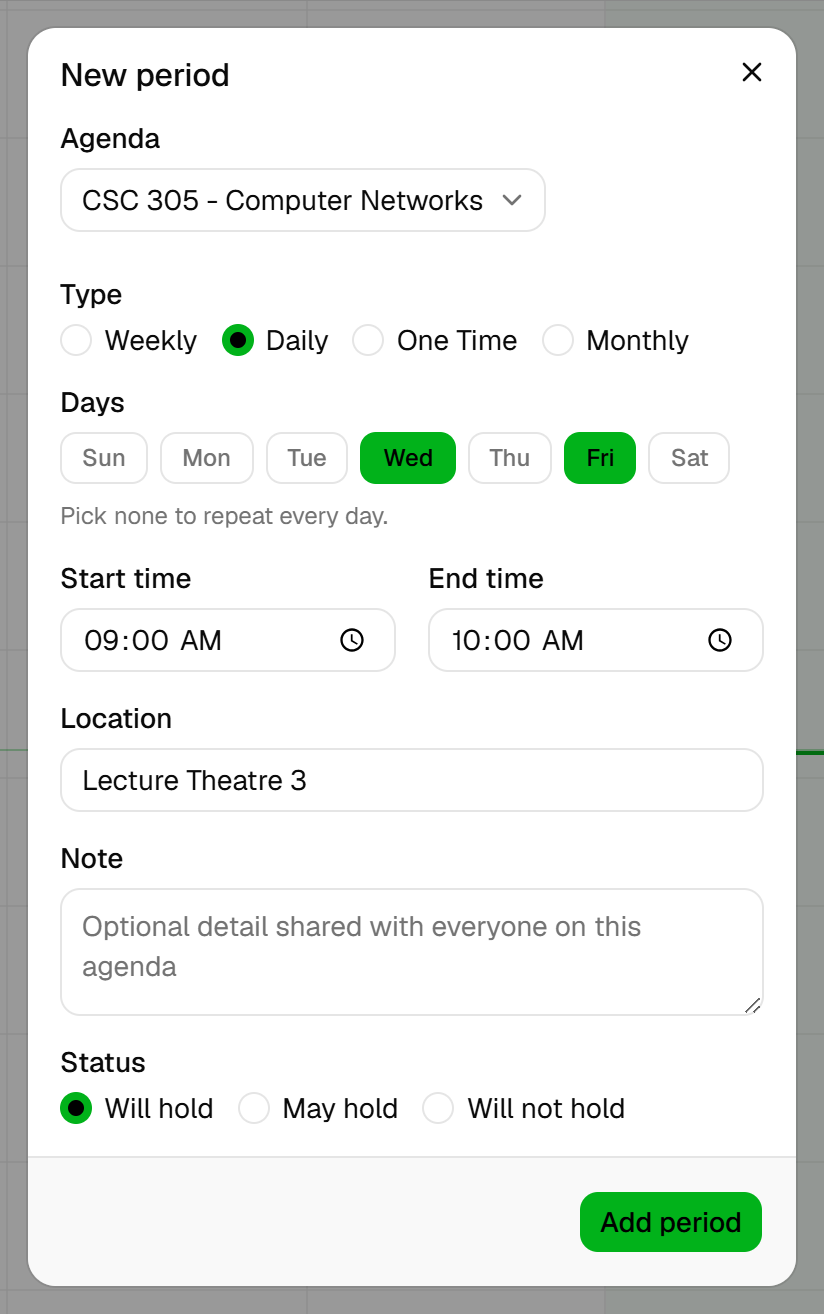
- Daily.
- Click each day the class meets.
Desktop: A daily period on Wednesdays and Fridays. Set the Start time and End time, add a Location, and a Note if you want one. The note is shared with everyone on the agenda. Status says Will hold by default. Change it to May hold or Will not hold if the class is in doubt.
Click Add period. You see Period added and the block appears on the grid. Repeat for every time the course meets.
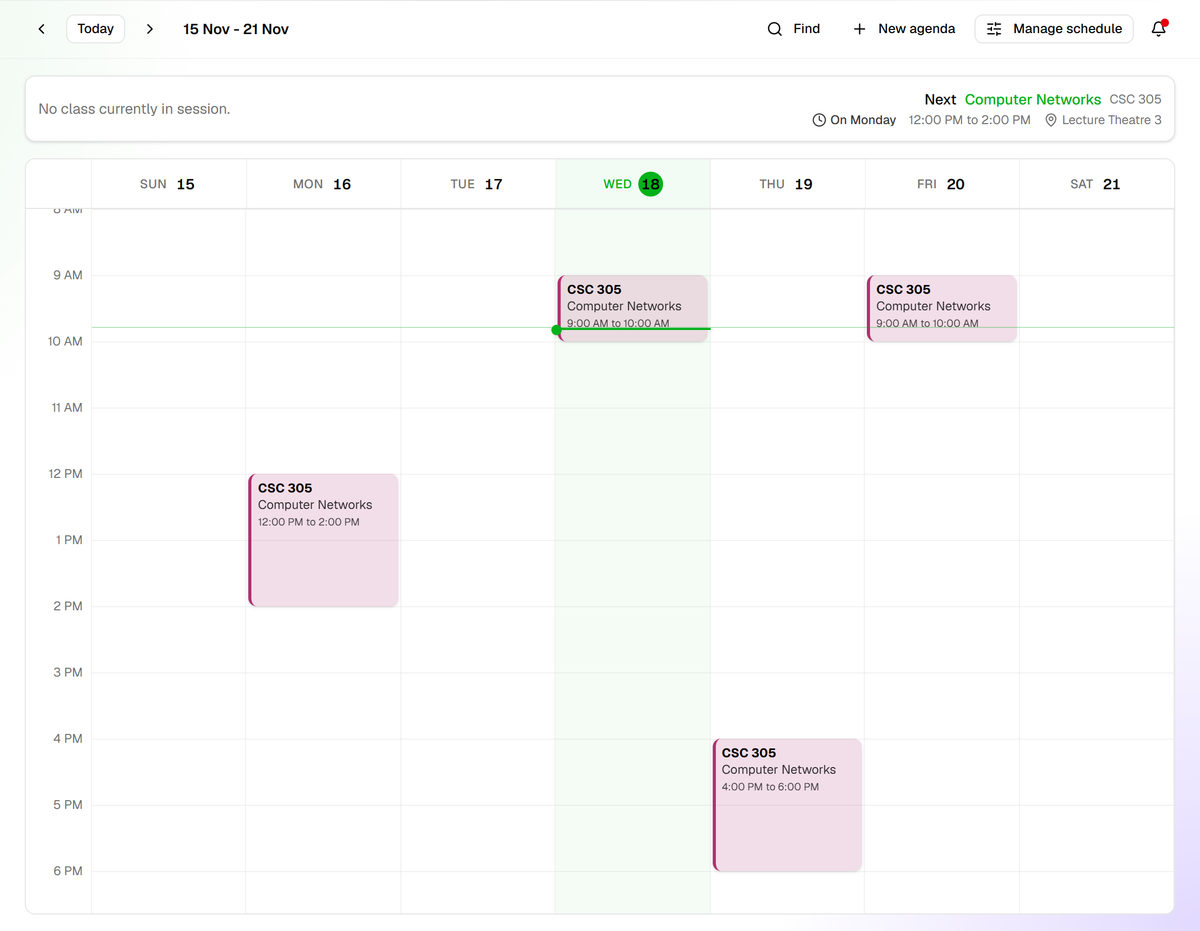
- The weekly period.
- The daily period, once for each day you ticked.
- The one time period, on its own date.
Desktop: The week with the agenda's three periods.
Change or remove a period
On the agenda, tap the period. Change what you need and tap Save, or tap Remove to delete it. There is no confirmation, so check before you tap.
Click the block on the grid. In the box that opens, click Edit to change it or Delete period to remove it. On a daily period that repeats on several days, the button names the day you clicked, for example Remove Wednesday, and takes away only that day. An Undo message appears for a few seconds.
Good to know
- Acadeva does not stop two periods from overlapping. On desktop, overlapping blocks share the column side by side. Check the week after you add a period.
- Periods are saved on your device first and sent to Acadeva when you are online. On the phone, an Unsynced changes tag shows on the Manage schedule screen until they have been sent.
If it doesn't work
- There is no Create new period or Add button. You are looking at an agenda you joined. Only the owner can add periods. Use Clone on the phone or Duplicate on desktop to get a copy you own.
- The agenda would not save. Creating an agenda needs a connection. Check you are online and try again.
- A period is not on my Schedule. A one time period only shows in the week that holds its date, so move to that week. Also check you picked the right day for a weekly period.